認識 Laravel Queue Jobs
在建立 Web 應用程式時,可能會遇到一些任務,例如解析和儲存上傳的 CSV 文件,這些任務在典型的 Web 請求中執行起來可能耗時過長,或是網站文章流量大,可以改成非同步 queue 寫入資料庫,以減少對主流程的影響,並提升效能與延展性。
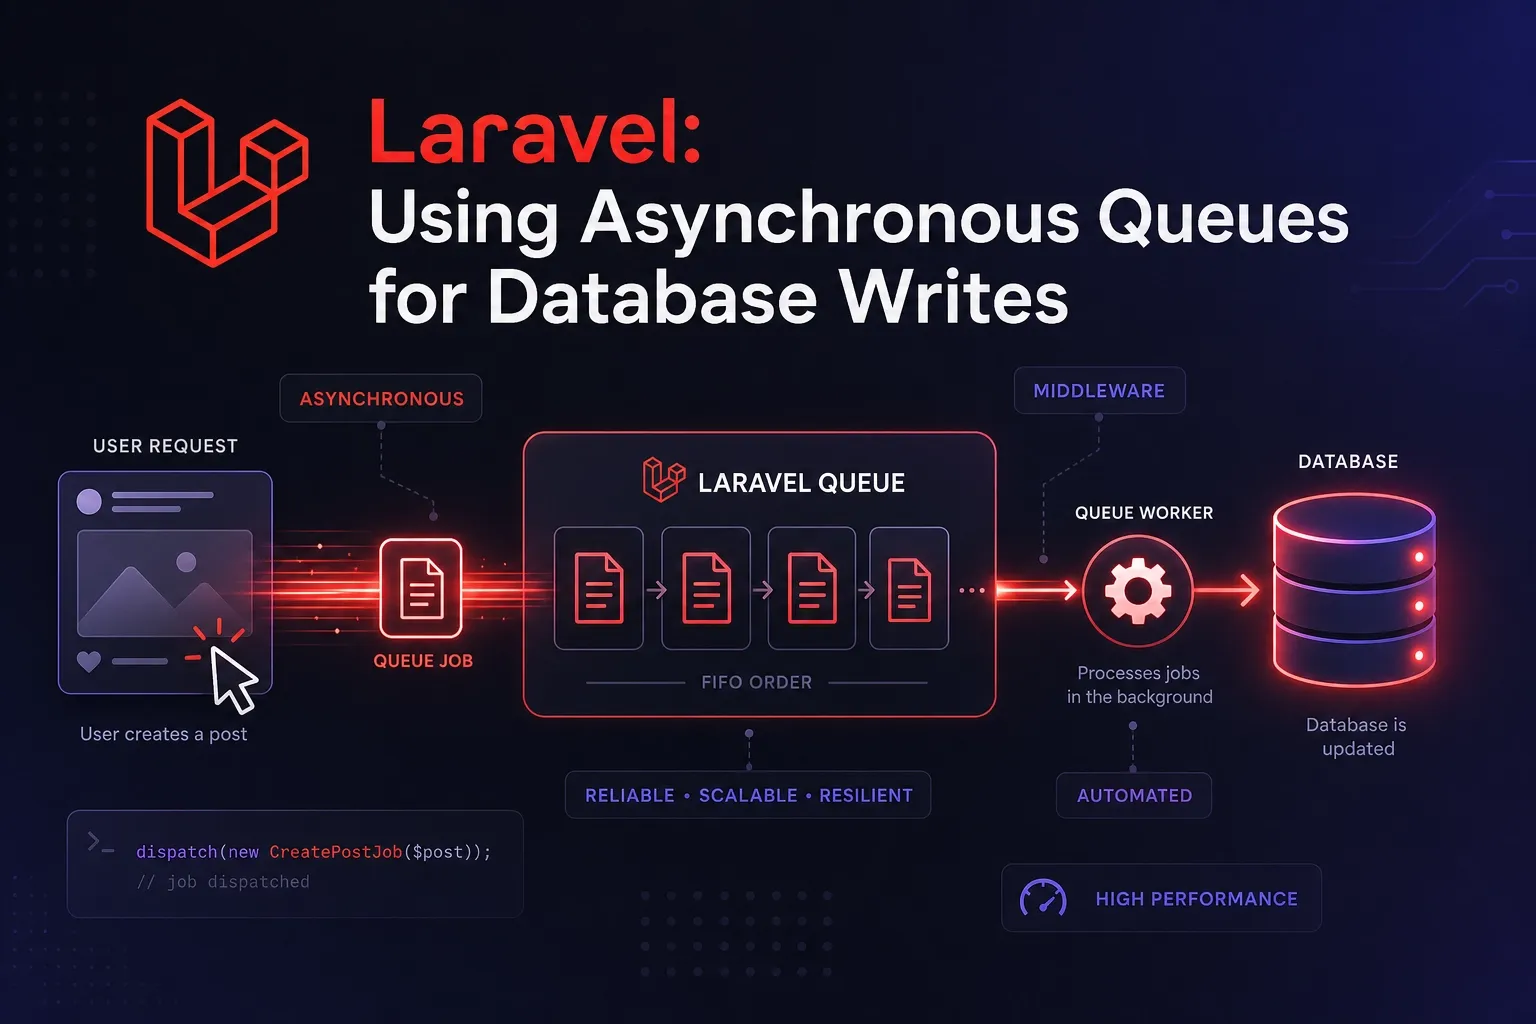
queue 是一種先進先出的資料結構,而 Laravel 的 queue job 是一個類似待辦清單的功能,以 queue 的方式儲存待辦的任務 (job),然後會有 Worker 依序執行,可以輕鬆建立背景處理的佇列作業。透過將耗時任務移至佇列,使得應用程式可以以極快的速度回應 Web 請求,並為用戶提供更佳的使用者體驗。
Laravel 的佇列設定選項儲存在應用程式的 config/queue.php 設定檔中。在 migrations: xxxx_xx_xx_xxxxxx_create_jobs_table.php 會建立相關的資料表(table),供此文件 config/queue.php 中包含框架自帶的每個佇列驅動程式(driver)的連接配置(connections),包括資料庫(database)、Amazon SQS、Redis 和 Beanstalkd 驅動程序,以及一個可立即執行任務的同步驅動程式(供本機開發使用)。此外,還包含一個空隊列驅動程序(job_batches),用於丟棄已排隊的任務(failed_jobs)。
Connections vs. Queues
在開始使用 Laravel 佇列之前,請務必先了解「連結(connections)」和「隊列(queues)」之間的差異。在 config/queue.php 設定檔中,有一個連線配置陣列。此選項定義了與後端佇列服務(例如 Amazon SQS、Beanstalk 或 Redis)的連線。但是,任何給定的佇列連線都可能有多個“佇列”,這些佇列可以被視為不同的佇列或排隊作業堆。程式碼舉例: 可立即執行任務:’sync’、 資料庫(database)、Redis 如下:
'connections' => [

	'sync' => [
		'driver' => 'sync',
	],
	'database' => [
		'driver' => 'database',
		'connection' => env('DB_QUEUE_CONNECTION'),
		'table' => env('DB_QUEUE_TABLE', 'jobs'),
		'queue' => env('DB_QUEUE', 'default'),
		'retry_after' => (int) env('DB_QUEUE_RETRY_AFTER', 90),
		'after_commit' => false,
	],
	'redis' => [
		'driver' => 'redis',
		'connection' => env('REDIS_QUEUE_CONNECTION', 'default'),
		'queue' => env('REDIS_QUEUE', 'default'),
		'retry_after' => (int) env('REDIS_QUEUE_RETRY_AFTER', 90),
		'block_for' => null,
		'after_commit' => false,
	],
]請注意,佇列設定檔 config/queue.php 中的每個連線配置範例都包含一個佇列屬性。這是作業傳送到給定連線時將被調度到的預設佇列。換句話說,如果您調度作業時沒有明確指定要調度到哪個佇列,則該作業將被放置在連接配置的佇列屬性中定義的佇列中:
use App\Jobs\ProcessPodcast;

// This job is sent to the default connection's default queue...
ProcessPodcast::dispatch();

// This job is sent to the default connection's "emails" queue...
ProcessPodcast::dispatch()->onQueue('emails');實作
文章 在 Laravel 中實作「文章點閱率統計」 中的 middle 方式來改成 改成非同步 queue 寫入資料庫,以減少對主流程的影響,並提升效能與延展性。
實作目標
- 使用 Laravel 的 Queue 任務 寫入
post_views表。 - Middleware 或 Controller 中只派送任務(不阻塞請求)。
- 每篇文章、每 IP、每天只記一次。
一、建立 Job 任務
新增一個 job class,在 handle 方法裡寫這個 job 具體要做的事。
php artisan make:job LogPostViewJob程式碼撰寫如下:
// app/Jobs/LogPostViewJob.php
namespace App\Jobs;

use App\Models\Blog\BlogView;
use Illuminate\Bus\Queueable;
use Illuminate\Contracts\Queue\ShouldQueue;
use Illuminate\Queue\{InteractsWithQueue, SerializesModels};
use Illuminate\Foundation\Bus\Dispatchable;
use Carbon\Carbon;

class LogPostViewJob implements ShouldQueue
{
    use Dispatchable, InteractsWithQueue, Queueable, SerializesModels;

    public $postId, $ip, $host, $userAgent;

    public function __construct($postId, $ip, $host, $userAgent)
    {
        $this->postId = $postId;
        $this->ip = $ip;
        $this->host = $host;
        $this->userAgent = $userAgent;
    }

    public function handle(): void
    {
        $today = Carbon::now()->toDateString();

        // 避免重複寫入
        $exists = BlogView::where('post_id', $this->postId)
            ->where('ip', $this->ip)
            ->where('view_date', $today)
            ->exists();

        if (!$exists) {
            BlogView::create([
                'post_id' => $this->postId,
                'ip' => $this->ip,
                'host' => $this->host,
                'user_agent' => $this->userAgent,
                'view_date' => $today,
            ]);
        }
    }
}二、Middleware 修改(派送 Job)
更新先前的 LogBlogPostView middleware:
// app/Http/Middleware/LogBlogPostView.php
use App\Jobs\LogBlogPostViewJob;

public function handle(Request $request, Closure $next)
{
    $postId = $request->route('id') ?? $request->route('post');

    if ($postId) {
        $ip = $request->ip();
        $host = gethostbyaddr($ip) ?? 'unknown';
        $userAgent = $request->header('User-Agent') ?? 'unknown';

        // 改為非同步任務派送
        LogPostViewJob::dispatch($postId, $ip, $host, $userAgent);
    }

    return $next($request);
}
dispatch 底層其實是把任務 push 到 driver。
做 push 前,系統會先去看要推送到哪個 driver,driver 就是我們排隊的地方,可以是資料庫、Redis 等。有哪些 driver 和連線參數可以在config/queue.php 設定。
知道是要 push 到哪個 driver 後,會去看這個 driver 是否已建立連線;有就用,沒有就建立,最後才 push job 到 driver。
可以將程式優化如下:
$ip = $request->ip();
$host = gethostbyaddr($ip) ?? 'unknown';
$userAgent = $request->header('User-Agent') ?? 'unknown';
$today = Carbon::now()->toDateString();

$cacheKey = "blog_viewed:{$postId}:{$ip}:{$today}";

// 先檢查 Cache 若有值,改為非同步任務派送
if (!Cache::has($cacheKey)) {
	// 放入table:cache裡
	Cache::put($cacheKey, true, now()->endOfDay());

	// 放入table:jobs裡, 下面兩行指令是相同, 擇一即可
	LogBlogPostViewJob::dispatch($postId, $ip, $host, $userAgent, $user_id);
	Queue::push(new LogBlogPostViewJob($postId, $ip, $host, $userAgent, $user_id));
}當有點閱文章時,記錄不會馬上寫入 table: blog_view 中,而是先記錄在 table:jobs 裡

該 job 的 payload 內容類似下面這樣
{"uuid":"16e61136-acd8-446d-8278-3443e9831ec0","displayName":"App\\Jobs\\LogBlogPostViewJob","job":"Illuminate\\Queue\\CallQueuedHandler@call","maxTries":null,"maxExceptions":null,"failOnTimeout":false,"backoff":null,"timeout":null,"retryUntil":null,"data":{"commandName":"App\\Jobs\\LogBlogPostViewJob","command":"O:27:\"App\\Jobs\\LogBlogPostViewJob\":5:{s:6:\"postId\";s:1:\"3\";s:2:\"ip\";s:9:\"127.0.0.1\";s:4:\"host\";s:17:\"iccert.nhi.gov.tw\";s:9:\"userAgent\";s:111:\"Mozilla\/5.0 (Windows NT 10.0; Win64; x64) AppleWebKit\/537.36 (KHTML, like Gecko) Chrome\/137.0.0.0 Safari\/537.36\";s:7:\"user_id\";i:1;}"},"createdAt":1750482781,"delay":null}三、設定 Queue 驅動(使用資料庫或 Redis)
例如使用 database:
//.env

QUEUE_CONNECTION=database建立 jobs 表:
在 migrations: xxxx_xx_xx_xxxxxx_create_jobs_table.php 會建立相關的資料表(table),若沒有則執行下列指令
php artisan make:queue-table
php artisan migrate啟動 queue worker:
php artisan queue:work有起動 queue worker 時,才會觸發 logBlogPostViewJob

queue:worker 執行成功時,worker會寫入 table: blog_view 中,且將此筆工作(Job)從 table:jobs 移除

四、效能改善:改為 Redis
應用程式執行的某些資料檢索或處理任務可能會佔用大量 CPU 資源,或需要幾秒鐘才能完成。在這種情況下,通常會將檢索到的資料快取一段時間,以便在後續對相同資料的請求中快速檢索。快取的資料通常儲存在非常快速的資料儲存中,例如 Memcached 或 Redis。
- 若流量大,推薦使用 Redis 為
QUEUE_CONNECTION=redis。 - 可搭配 Horizon 管理 queue 狀態。
- 可進一步將「是否已記錄過」的判斷移至 Redis 快取,減少 DB 查詢。
$cacheKey = "blog_viewed:{$postId}:{$ip}:{$today}";
if (!Cache::has($cacheKey)) {
    Cache::put($cacheKey, true, now()->endOfDay());
    LogPostViewJob::dispatch(...);
}設定 Redis 快取
Redis 需要有 Redis: predis/predis ~2.0 or phpredis PHP extension 的套件
composer require predis/predis在 .env 作修正
//.env

QUEUE_CONNECTION=redis
REDIS_CLIENT=phpredis
REDIS_HOST=127.0.0.1
REDIS_PASSWORD=null
REDIS_PORT=6379大致上這樣就可以運作了