Physical Address
304 North Cardinal St.
Dorchester Center, MA 02124
Physical Address
304 North Cardinal St.
Dorchester Center, MA 02124

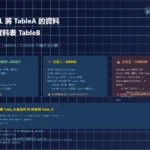
一個 完整的 AL 範例,可以在 Business Central 裡獨立運行,不依附於現有頁面,並且支援 CRUD(新增 / 查詢 / 修改 / 刪除)。
我們來建立一個 「Basic Table Records」 模組:
在專案底下新增檔案 BasicTable.al:
table 60100 "Basic Table"
{
    DataClassification = ToBeClassified;

    fields
    {
        field(1; "ID"; Integer)
        {
            DataClassification = SystemMetadata;
            AutoIncrement = true; // 主鍵自動編號
        }

        field(2; "Name"; Text[100])
        {
            DataClassification = CustomerContent;
        }

        field(3; "Description"; Text[250])
        {
            DataClassification = CustomerContent;
        }
    }

    keys
    {
        key(PK; "ID")
        {
            Clustered = true;
        }
    }
}page 60100 "Basic Table Page"
{
PageType = List;
ApplicationArea = All;
SourceTable = "Basic Table";
UsageCategory = Lists; // 讓它可以從搜尋直接找到
layout
{
area(content)
{
repeater(Group)
{
field("ID"; Rec."ID") { ApplicationArea = All; Editable = false; }
field("Name"; Rec."Name") { ApplicationArea = All; }
field("Description"; Rec."Description") { ApplicationArea = All; }
}
}
}
actions
{
area(processing)
{
action(SayTableRecord)
{
Caption = 'Say Table Record';
ApplicationArea = All;
trigger OnAction()
var
RecCopy: Record "Basic Table";
begin
if Rec.Get(Rec."ID") then begin
Message('Hello, %1!', Rec."ID".ToText() + Rec."Name");
end;
end;
}
}
}
}說明:
UsageCategory = Lists,這個頁面會出現在 Business Central 搜尋功能 (Tell Me) 中。launch.json在 .vscode/launch.json 加上:
{
   "version": "0.2.0",
    "configurations": [
        {
            "name": "Microsoft cloud sandbox",
            "request": "launch",
            "type": "al",
            "environmentType": "Sandbox",
            "environmentName": "Your Environment Name",
            "startupObjectId": 60100,
            "startupObjectType": "Page",
            "breakOnError": "All",
            "launchBrowser": true,
            "enableLongRunningSqlStatements": true,
            "enableSqlInformationDebugger": true,
            "tenant": "Your tenant Code"

        }
    ]
}打開根目錄下的 app.json,確認內容大致如下(修改成你的環境資訊):
{
  "id": "c6b1d2f1-019a-4140-98a5-995f3b1424ae",
  "name": "MS.BasicExercises",
  "publisher": "MingSheng",
  "version": "1.0.0.0",
  "brief": "Customization by MS",
  "description": "Customization by MS",
  "privacyStatement": "",
  "EULA": "",
  "help": "",
  "url": "",
  "logo": "",
  "dependencies": [],
  "screenshots": [],
  "platform": "1.0.0.0",
  "application": "26.0.0.0",
  "idRanges": [
    {
      "from": 60100,
      "to": 60149
    }
  ],
  "resourceExposurePolicy": {
    "allowDebugging": true,
    "allowDownloadingSource": true,
    "includeSourceInSymbolFile": true
  },
  "runtime": "15.2",
  "features": [
    "NoImplicitWith"
  ]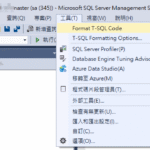
}可以查詢 extension Management 後, 從頁面中產生 Launch Configurations 檔案
 1")
記得 “application”: “26.0.0.0” 的主要版本要與開發或運行中環境一致,這樣按下 ctl+shift+p 執行 AL: Download symbols 才可以載下正常。
 2")
在 VS Code 按 F5(或 Ctrl+F5)
專案會被編譯並部署到 Sandbox
Business Central 瀏覽器自動開啟,會直接進入 Basic Table Page
你可以:
這樣你就有了一個完整的 獨立 CRUD 頁面!
 3")
新增一筆權限組: MS BASIC EXERCISES,並點選旁邊的 … 向下切入以記錄 權限組
 4")
控制是否可以 CRUD(新增 / 查詢 / 修改 / 刪除),在於 資料表資料 Basic Table 中的權限,另外要給 頁面: Basic Table Page 執行的權限。
 5")
可以先用篩選的方式將權限組:MS BASIC EXERCISES 找出來後,再勾選與用戶即可
 6")